Sunday, August 23, 2015

French Toast with a Zesty Twist


Lazy Sundays have always been my favorite. They're the "calm after the storm" of Saturdays. Although my Saturdays are no longer as crazy as they used to be, I still love waking up, making a cup of hot tea, grabbing the Sunday paper and snuggling between the covers while cutting my coupons and reading the comics. 

Sundays are also the days I make a nice, big breakfast (or brunch for those very lazy days). I typically stick to a vegetable-filled omelet, soy chorizo and cilantro egg scramble or a typical Polish-style breakfast with a selection of breads, cheeses and fresh vegetables.

This morning, however, I broke out the Williams-Sonoma Bride & Groom Cookbook Joe and I received from his mother as a engagement gift. This is where I discovered the best French Toast i have ever had. The secret ingredient? Orange zest mixed with the batter. It added a unique, fresh taste to it. Of course, I had to make a few small adjustments, including substituting regular milk for almond milk and decreasing the sugar amount. Give it a shot, it makes all the difference! 


Serving Size: 4
Total Time: 45 minutes

Ingredients

  • 1 baguette (one-day old so it absorbs the mix better)
  • 4 large eggs
  • 2 cups almond milk (or any other milk)
  • 1 teaspoon vanilla extract
  • 1 teaspoon grated orange zest
  • 2 tablespoons freshly squeezed orange juice
  • 2 teaspoons sugar
  • 3/4 teaspoon salt
  • 2 tablespoons butter (preferably from grass-fed cows)
Instructions
  1. Slice the baguette so that it is about 2 centimeters thick.
  2. In a large bowl, combine the eggs, milk, vanilla extract, orange zest, orange juice, sugar and salt. Mix well. 
  3. Submerge the slices of baguette for at least 15 minutes, turning once. This ensures  a custard-like interior when the bread is cooked.
  4. Preheat the oven to 200 degrees Fahrenheit. Next, melt some butter on a frying pan over medium heat. Place the slices of bread, in batches, on the hot frying pan and reduce the heat to low. Cook each slice until it is golden brown (about 3-4 minutes on each side). 
  5. Keep the slices of cooked baguette in a single layer in the oven to keep warm before serving.
  6. Sprinkle with powdered sugar, if desired.


Wednesday, August 19, 2015

Homemade Laundry Detergent


Anyone who has dogs understands how much extra laundry you go through in a week. Towels, towels, towels. Every time it rains, we need one for their paws, another by the door because they still find a way to get the floor wet, and of course, one for drying them because that's their favorite part. I swear they go out in the rain sometimes just to be dried later. I can appreciate that; I would love being snuggled with a towel too. I digress. On top of all the towels, the blankets on the couch need a little bit of extra love because my pups are spoiled and therefore pretty much own the couch. Forget me wanting to ever sit on it! And wait for it.. my dogs have their own special pillows that they sleep on and since drooling happens, the pillowcases need washing a bit too often. Oh, and don't forget the fiance! Yeah.. we do laundry fairly often around here.


I have always been a liquid detergent kind of girl, but hated all the money I spent on it. And don't even get me started on all the packaging polluting this planet. Oh man! You can imagine what a relief it's been when I learned I can make my own, with only 5 simple and inexpensive ingredients that can be found in the laundry isle in most stores. It's also reassuring to know exactly what's in my detergent.


Since most of the ingredients are powder, I just combine them together in a bin that can be sealed tightly to prevent clumping and mix together with my hands. I use a grater to shred the soap bars, which surprisingly, doesn't take too much effort. However, I once asked my fiance to help and being a man, he needed a quicker and easier solution. So that's when the food processor came into the picture. It actually worked grate! (see what I did there?) I also added Downy Unstoppables to this batch for some extra fragrance, but I usually leave it out because i found it does great on it's own. It's really a preference thing.


Depending on the size of your load, use about 2 tablespoons of the mix. Oxiclean comes with a measuring scoop which I've been using, but if you prefer, you can buy a stainless steel coffee scoop. My clothes (and dog towels) come out squeaky clean and smell fantastic! Not to mention all the money I saved. All of the ingredients cost me less than $30 (only about $20 if you skip the scent booster) and lasted much much longer than the 3 containers of liquid detergent I could have bought with this money. 


Ingredients

  • 55 Ounces Super Washing Soda
  • 4 Pounds Pure Baking Soda
  • 4 Pounds Borax
  • 3 Pounds OxiClean
  • 3 Bars of Laundry Soap
  • 19.5 Ounces of Scent Booster Laundry Beads (Optional)
Also need
  • An air-tight container
  • Measuring scoop
  • Grater (or food processor)
Instructions
  1. Combine all powdered ingredients in the bin and mix with your hands.
  2. Grate the soap bars, or use a food processor for quicker shredding.
  3. Add a scent booster, if you like. And that's it!


Saturday, August 15, 2015

Blue Cheese Sauce Pasta

Most of my cooking days consist of "what can I do with what I have". I know, I try to plan for the week, but the BOGO sales at Publix always get me and I end up with more food than I need. So, I usually end up with the first half of the week planned and the second a mix of everything. I must say, I can get pretty creative!


Since Joe and I were leaving for Orlando this past weekend, I wanted to use up what I had on Friday since wasting food is a sin in my book. I needed to use the produce, therefore the spinach and mushrooms had to be used. 


And of course, the blue cheese crumbles wouldn't survive another week and I figured making it into a sauce was the way to go. I used almond milk, which I always have on hand, to give the sauce a creamier, more saucy, texture. I also added some lemon juice for oomph and Voila! 


The end result was heavenly! The pungent blue cheese along with the delicate spinach was the perfect combination and the lemon zest gave it a nice finish. This recipe would also work great with Gorgonzola cheese and pretty much any other vegetables

Serving Size: 2
Total Time: 20 minutes

Ingredients
  • 5 ounces of whole wheat Fusilli pasta
  • 1/2 cup blue cheese, crumbled
  • 1/4 cup almond milk
  • 1/2 lemon, juiced and zested
  • 1 tablespoon olive oil, divided
  • Salt and pepper, to taste
  • 1/2 cup of mushrooms
  • 1 cup of fresh spinach

Instructions
  1. Bring a pot of water to boil and add your pasta. Cook according to directions on the box.
  2. While pasta is cooking, mix the almond milk and blue cheese in a bowl. Next, zest the lemon and add the juice to the bowl. Save the zest for garnish for the end.
  3. In a small frying pan, drizzle about half a tablespoon of olive oil and sauté the mushrooms for a few minutes, until it's to your liking.  Sprinkle salt and pepper on top.
  4. Once pasta is done, drain the water and move the pasta back into the pot. Add  a little bit of olive oil and stir in the spinach so that it starts to wilt. Pour in the blue cheese sauce and mushrooms and stir. Sprinkle with lemon zest and serve.

Sunday, August 2, 2015

Keep Your Cilantro Fresh for Longer


There are two types of people in this world. Those who love cilantro and those who think it tastes like soap. Since I'm on the side that loves it, I go through it like crazy. It adds a nice and fresh flavor to almost any dish, from salads to rice to scrambled eggs for breakfast. 

Joe is Colombian so he grew up with it and therefore loves it just as much. However, sometimes I get a little too excited, end up buying too much and it goes bad before I can use it all. I wanted to buy one of those fancy herb keepers, but I couldn't justify spending $20+ on one so I made my own. 


To start, snip the rubber band or tie and rinse your cilantro or parsley (this method works on both) so that you can use throughout the week without worrying about washing every time. Trust me, it's much easier to wash all at once. However, make sure that it is completely dry before storing as this may promote rotting. Next, fill a glass with enough water so that the ends are submerged, but not the leaves. It's important to not submerge the leaves as they will also rot and get slimy and smelly. I usually place a small plastic bag on top without closing it to prevent air from damaging the herb. This method keeps my cilantro fresh for weeks, but who knows, it might be longer! I just never keep mine long enough to know :)

Thursday, July 30, 2015

Soy Chorizo Stuffed Poblano Peppers


I have always wanted to try cooking with Poblano peppers. I should mention that I'm a wimp when it comes to spicy food so the thought of a pepper that I could handle (aside from bell peppers) was intriguing. I tried them once in a Mexican restaurant with Joe and it was love at first sight. Now, how can I prepare them at home? Since I had them stuffed with rice at the restaurant, I figured stuffing was the way to go.


However, I wanted to place them over rice rather than filling them with it so I had to find a different substance, preferably rich in protein to keep me full for longer. Then it hit me, I had some organic soy chorizo that I bought at Trader Joe's the week before.  As a side note, if you haven't tried soy chorizo yet, you're missing out.  It's just as flavorful and versatile as the real stuff, minus all the fat.

Since I love veggies, I wanted to add some carrots and celery that I had to use before they went bad. Lastly.. black beans. I almost always add beans to a Spanish type dish. Since I wanted to melt some cheese on top, I wanted to place the stuffed peppers in the oven, but didn't want them to burn which gave me the idea to use some diced tomatoes on the bottom as a base.  


The aroma in the kitchen was overwhelmingly delicious! I was probably checking on them every 10 minutes because I couldn't wait for them to be done. Finally they were! And the result? Success! They came out looking beautiful and they tasted just as great. The zesty chorizo along with the mild pepper make the perfect combination.  Please comment below to let me know how you cook with poblano peppers!


Ingredients
·         6 poblano peppers
·         1chopped onion
·         1 chopped carrot
·         2 stalks of chopped celery
·         2 cloves of garlic, minced
·         1 12 oz. package of soy chorizo
·         1 15 oz. can of black beans
·         1 15 oz. can of diced tomatoes (I used fire roasted)
·         Coconut oil (or any other oil for sautéing)
·         1 tsp paprika (because I'm Polish)
·         1 tsp chili powder
·         Salt and pepper to taste
·         1/4 cup chopped cilantro
·         Shredded cheese (Any kind you like and however much your heart desires. I only had sliced cheese on hand so that is what I used)

Instructions
1. Add some oil to the pan* on high heat. After it's hot, add chopped onion and sauté for about 3 minutes.
2. Add chopped carrots, celery and garlic** and sauté for a few minutes, stirring occasionally. Once tender, add the soy chorizo, black beans and seasoning.
3. While the mixture is cooking on low heat, cut the top off the poblano peppers , then core and seed the peppers.
4. Move the mixture to a bowl and let it cool for a few minutes. In the meantime, preheat the oven to 400 degrees.
5. Once the mixture has cooled, begin stuffing peppers, along with some shredded cheese. I used toothpicks to secure the top and body of pepper together.
6. Once the peppers are stuffed, add diced tomatoes to the pan and place stuffed peppers on top. Sprinkle with cilantro and shredded cheese. Move the pan to the oven and bake for about 40 minutes.
7. Serve over rice.
*Use an oven-safe pan. If you don't have one, you can always use two different pots/dishes, one for sautéing on the stovetop and one for baking in the oven.
**Let your garlic sit for a few minutes after smashing and mincing so that flavors are released. This also helps enhance the health-promoting properties of garlic.

Sunday, July 26, 2015

Save Your Ginger

I love ginger. Love it. However, just the thought of peeling it makes me grab the powdered version. Or, ..mincing it -eek! No thank you. Too much work for even me. I often cook Asian dishes and most of them call for fresh ginger so I always try to keep some on hand. Then, of course, I get a bit lazy and don't end up using it and it goes bad. I hate to waste. But as frustrating as this endless cycle seemed, I could never think of a solution. 


A few weeks ago, my sister was visiting and we decided to make a veggie teriyaki bowl so I pulled out my ginger from my fridge drawer along with the other ingredients we were planning on using. Engulfed in conversations and with a glass of wine, I didn't pay much attention as my sister grabbed my grater and proceeded to grate the piece of ginger, with skin and all! I almost chocked on my wine. Where did this idea come from and where has it been my whole life? 


Yes, grating ginger is a thing. And, wait for it, it gets better, you can freeze it too! Say good-bye to old and stale ginger. In fact, freezing it helps make grating easier. Now I always keep my piece in a freezer bag and simply grate an inch or so whenever I need it for cooking. 


Does anyone else know about this easy trick? Please comment to share your tips! :)


Saturday, July 25, 2015

Spaghetti & Bean Balls

I'm pretty sure we all have those "I'm craving spaghetti" moments. You boil your pasta, make your tomato sauce (or open a jar of it) and ...yum? Something is missing.. Ah yes, the meatballs! But since I rather skip the meat, I decided to take to Pinterest for some other ideas. There had to be some alternatives. And of course, there were! Some posts used quinoa and others used beans and since I had some cans of beans on hand, I figured I'd try that recipe. So although bean "meat"balls are a genius idea, I am not the genius behind them. This recipe is adapted from Cookin' Canuck's blog.


The final test was having my meat-loving fiance take a bite. Success! His exact words were "wow, they're actually really good".  Not only were they delicious, but they also had the same fulfilling qualities of meat that left me satisfied for hours.


I made sure to use whole-wheat organic pasta from Trader Joe's, which unlike white pasta that is full of empty calories, has plenty of fiber and protein. Also, my general rule of thumb is that if you can't pronounce the ingredients, you shouldn't be eating them.
Ingredients of Trader Joe's whole-wheat spaghetti: Organic Durum Whole Wheat
Ingredients of generic white spaghetti: Semolina, Niacin, Ferrous Sulfate (Iron), Thiamin Mononitrate, Riboflavin, Folic Acid,


Ingredients
·         2 cans of white kidney beans (also known as cannellini beans)
·         One whole roasted red bell pepper
·         1 onion (I used sweet since I didn't have yellow on hand)
·         2 cloves of garlic
·         1/4 cup fresh parsley
·         2 tsp Sicilian dry seasoning (or any Italian)  
·         1 tsp salt
·         1 tsp fresh ground black pepper
·         1 egg
·         3/4 cups dried breadcrumbs
·         A jar of your favorite sauce (I usually like to make my own, but I also keep a jar on hand for those lazy days)
·         Cooked Spaghetti
·         Fresh Parmesan cheese for grating
Instructions
1. Preheat oven to 350 degrees.
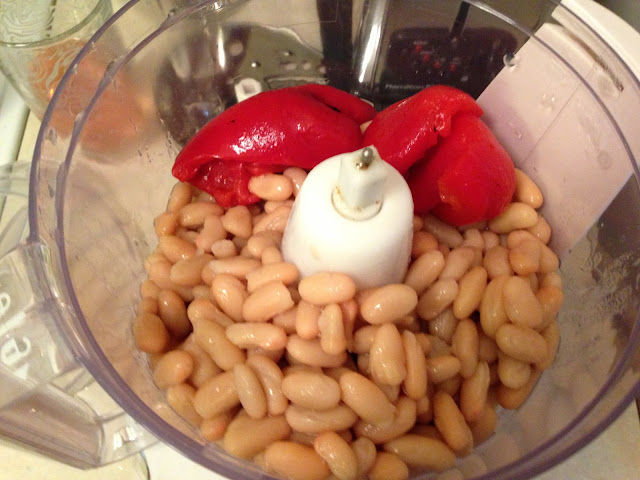
2. Combine beans and roasted red peppers in a food processor and blend until pureed.
3. Transfer mixture to a bowl and add in chopped onion, garlic, parsley (leave some for garnish at the end), seasoning, salt, pepper, egg and breadcrumbs. Stir till the mixture is evenly combined.
4. Depending on the size of bean ball that you want, roll some of the mixture in between your palms and place on a prepared baking sheet. Make sure to leave some space in between the bean balls so that they don't stick together.
5. Bake for about 15-20 minutes, until the bean balls are firm and golden. While the bean balls are baking, heat your sauce according to instructions.

6. Serve spaghetti and top with grated Parmesan cheese and fresh parsley!